Sometime during 2000 in the midst of the work on the top deck, I was advised that a whole pile of seat frames at Tempe were to be sorted through and the surplus disposed of, so I thought I had better bite this bullet, selected a set of decent looking frames and by scientific packing fitted all thirty of them in my Mitsubishi van. However they were all post war frames, with the legs set in from the aisle by about six inches. Pre-war seats have the legs right on the aisle and they are also about 20 mm lower in height. So every seat frame had its legs cut off and measured and refitted right at the end of the frames, on the aisle. This was completed by Easter 2001, and they were all placed in position in the bus to see that the tops lined up. Note that some of the tops appear to have slightly different radius curves at their ends: this will be fixed when they all get new tops.

LOOKING TOWARDS THE STAIRCASE UPSTAIRS, SEAT FRAMES HAVE BEEN SET IN PLACE TO CHECK FITS AND ALIGNMENT WITH THREADED SOCKETS IN THE FLOOR. NOTE HOW THE LEGS STAND AT THE AISLE, TENDING TO CATCH PEOPLE'S FEET. THIS WAS REMEDIED IN POST-WAR PRODUCTION
These are stacked up outside still awaiting sand blasting and priming before receiving new chrome plated tops far cheaper than trying to replate the old tops, which are pretty rusty and pitted from sweaty palms.
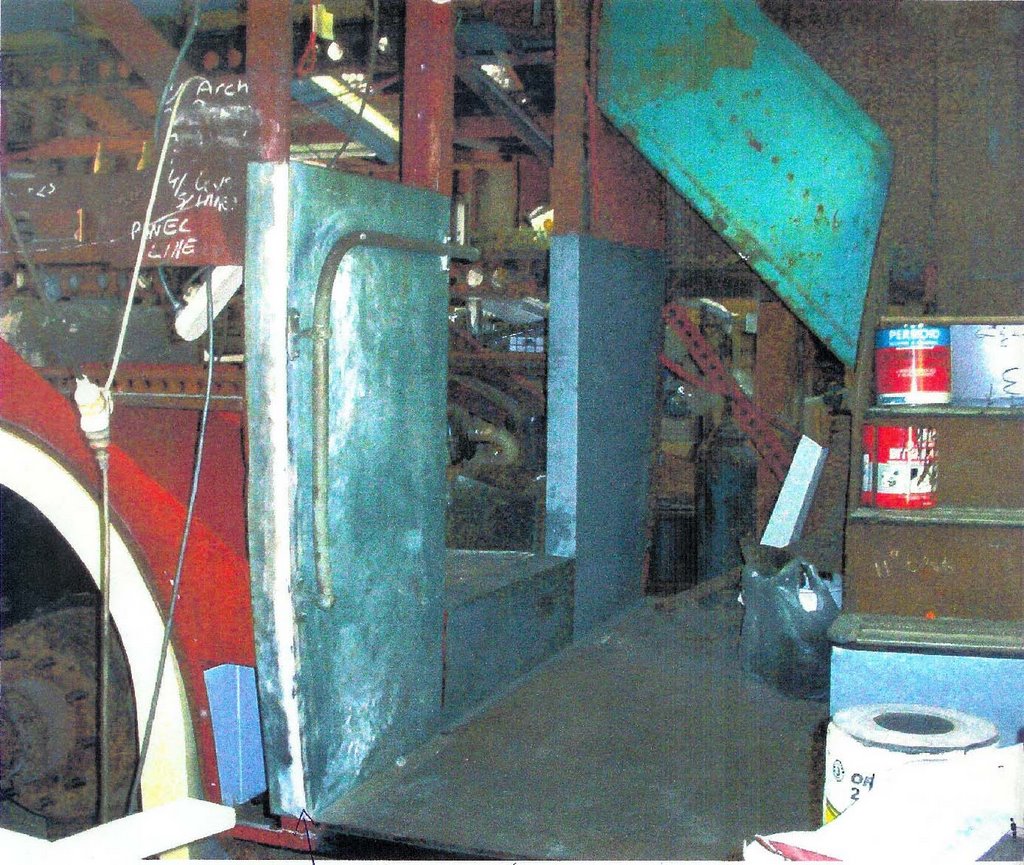
Then not wanting to face the mudguard problem, I made a new side destination box (out of the steel from a Hoover dryer) to replace the battered and rusted one, with new lights and wiring and mounts for the winder mechanism.
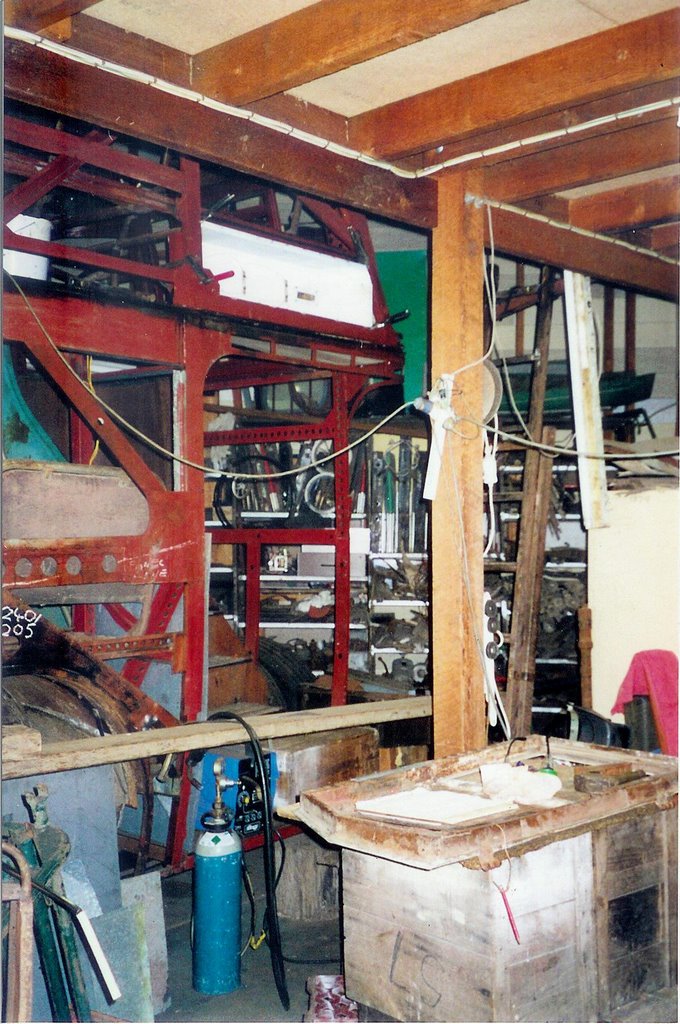
AN OUTSTANDINGLY MESSY SCENE; THE PARAPHERNALIA OF A RESTORATION. THE NEW DESTO BOX IN PLACE (CENTRE TOP, IN WHITE), THE CAB DOOR ABOUT TO RECEIVE ATTENTION FOREGROUND, AND A NEW DIAGONAL BRACE AND LETTER BOARD CAN BE SEEN CENTRE LEFT IN THE LAST WINDOW BEFORE THE REAR PLATFORM
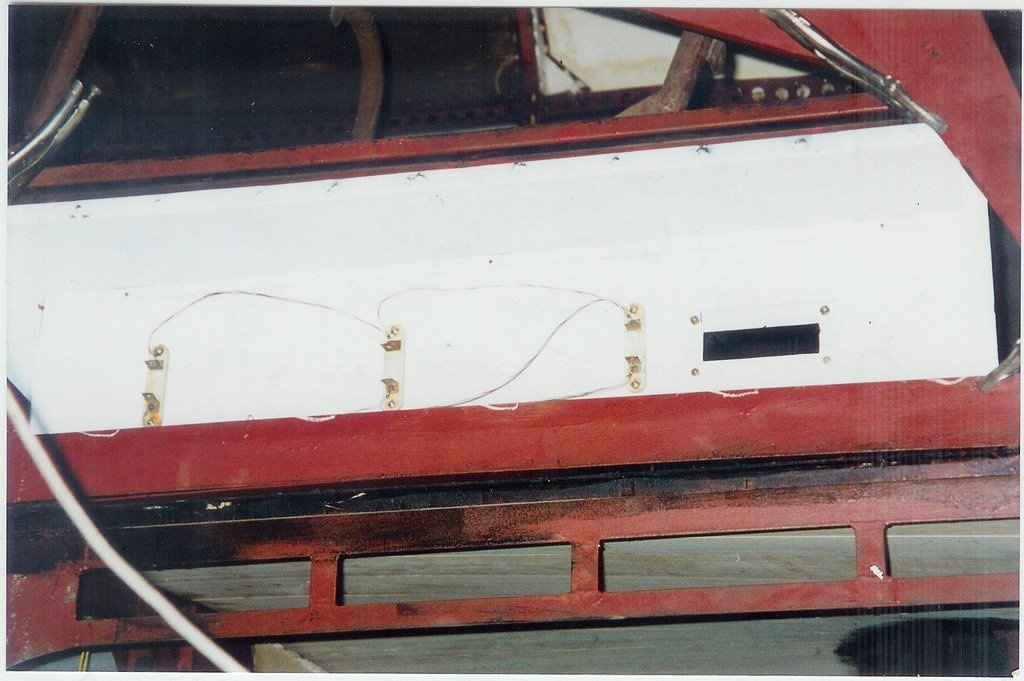
A CLOSE-UP OF THE NEW SIDE DESTINATION BOX MADE FROM HOOVER DRYER PANELS. THE LAMP FITTINGS ARE THE ORIGINAL CERAMIC AND BRASS MOUNTINGS, TO, TAKE FESTOON LAMPS (12 VOLT IN THIS CASE). UNDER IT, THE LATTICE FRAMING OVER THE REAR PLATFORM ENTRANCE IS ALSO NEW TO REPLACE RUSTED SECTIONS April 2001
The cab door then got a makeover with some new framing. But eventually I had to face the music.
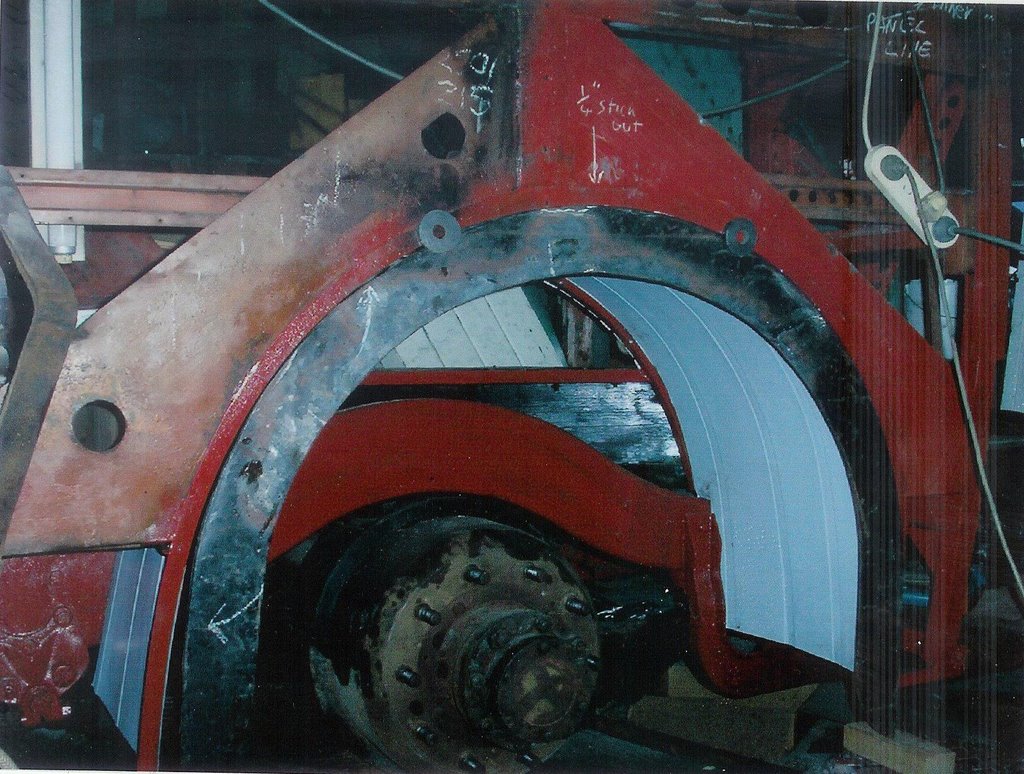
The mudguards were terrible. Even Brian Mantle, looking at the driver’s cab one, said ‘it’s pretty bad’. It is in two halves, an inner and an outer. The inner half was not too bad, but a mess where it joined to the cab floor boards and needed the whole bottom edge remade. The outer half was dented, torn and rusted away in many places. I started to panel beat it using oxy to try to shrink out the creases, not very successfully, and thought of Alan Fletcher who had a number of TD5s and might be able to help. He said to come and have a look and in July 2001 I raced up to Seaham imagining a semi-perfect mudguard just needing a bit of dressing and welding here and there.
Alan’s front guards were worse off than mine. However, as we discussed the problem he generously donated a slightly modified post-war PD2 guard which, if I remember correctly, was meant for a Bristol double decker. It had the same external profile as a TD guard, but was different across the front and inside the cab and was slightly larger in diameter. The offside front guard now consists of the front twelve inches of the original, the middle of the PD2 guard, made narrower and reduced in diameter by cutting and shutting at several points, and a new rear flared section made from a Malleys washing machine rear panel.
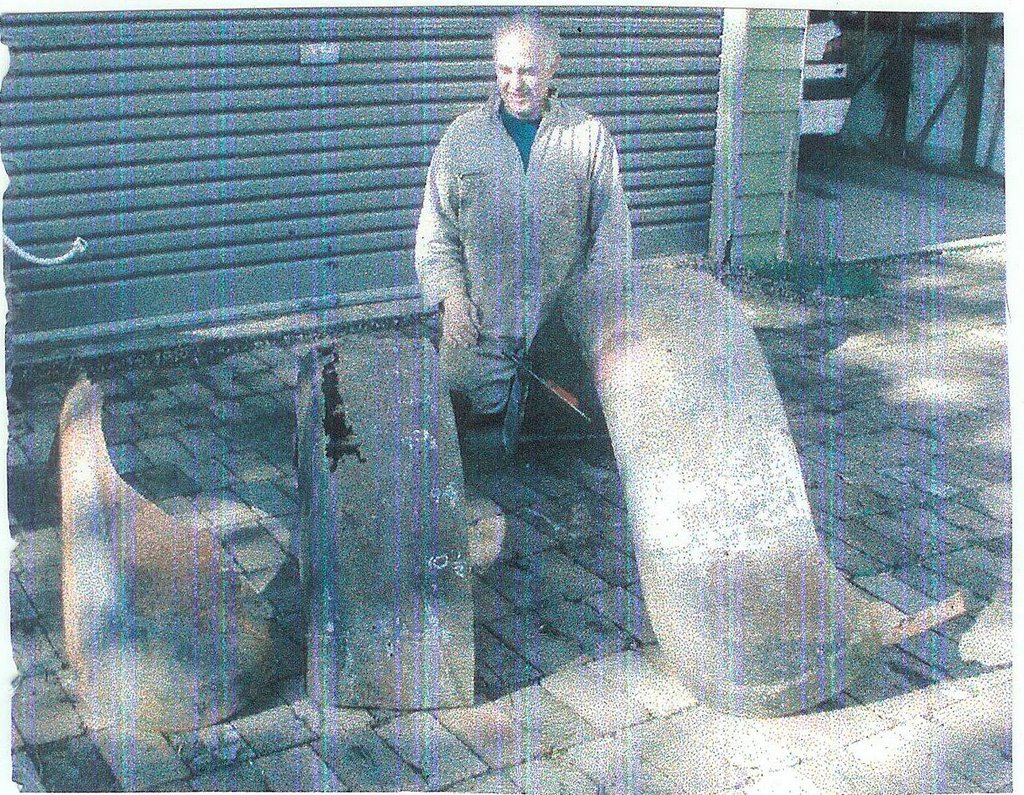
SCANNED FROM A VERY POOR PRINT THIS IS THE ONLY PHOTO OF THE OFFSIDE FRONT MUDGUARD TO SURVIVE.
AT LEFT IS AN UNUSED GUARD FROM ALAN FLETCHER WITH ITS RUST CUT OUT, CENTRE IS WHAT WAS LEFT OF THE ORIGINAL AFTER HAVING THE FRONT 12" CUT OFF IT, AND RIGHT IS THE FINAL ARTICLE BEFORE GRINDING AND SANDING SMOOTH.

THE VIEW OF THE ENGINE AND CAB THROUGH THE CAB DOOR AFTER STEAM CLEANING. THE PIPE POINTING DOWNWARDS AT TOP LEFT WILL CARRY THE WIRING TO THE STARTER, YET TO BE REFITTED. THE THREE RECTANGULAR APERTURES BESIDE THE ENGINE ARE THE DRIVER'S HEATER: SLIDING PANELS IN EACH ONE CAN BE RAISED TO LET NICE WARM AIR FROM THE ENGINE BAY IN DURING WINTER!
Whilst this was going on with the two front mudguards off the vehicle, the cab and engine area got some attention. The cab was stripped of everything and a new mounting bracket made where the offside mudguard attaches to the firewall under the driver. The old one, very rusted, was full of dead matches, many hundreds of them. Obviously drivers lighting a fag would drop the match with their right hand onto the bit of floor just behind the mudguard, so I guess there were about twenty-five years’ accumulated droppings there!

THE BUS HAS BEEN DRAGGED OUT OF ITS SPOT TO PERMIT STEAM CLEANING OF THE CAB AND ENGINE BAY AREAS. THE NEW FRONT SCUTTLE IS OBVIOUS, WITH THE ORIGINAL MOUNTING FOR THE OFFSIDE HEADLAMP REINSTATED AND THE DRIVERS AIR VENT RAISED BACK TO ITS 1937 POSITION (SEE THE 1938 SHOT OF THE BUS, IN "BACK IN 1937", BELOW)
The starter was overhauled and refitted, after steam cleaning the engine and chassis area. These got a coat of paint and a lot of details were attended to in the cab area. After stripping the interior of the cab of all paint and debris, much time then went into restoring all the gear in the cab: switchboards, fuses, wiring, buzzer, instruments, instrument board, voltage regulator, conduits, etc. A new front scuttle was made to permit the refitting of the headlamp bucket and the driver’s vent in their 1937 positions. Alan Fletcher gave me a genuine TD driving light switchboard to replace the missing one. This needed serious restoration to unjam all the switches and corroded terminals.
It is identical to an Albion CX19 one except that the starter switch is blanked off. (The TD4 has a weird 12v/24v changeover switch on the firewall behind the driver’s right leg to operate the starter). From model TD5 onwards this oddity was resolved by making the whole system 24 volts. I was surprised to learn later on while visiting UK that virtually all the their TD4s were converted to 24 volt systems. The reason for the difference was that as diesel engines came into common use in bus fleets, it was found that a 12 volt starter simply did not have the grunt to turn over a cold diesel engine with 15-1 compression ratio. A petrol engine with 4-1 compression, no problem.
The engine and diesel injection gear were next in line: these got a good clean up, a jammed fuel pump element was freed up, the timing and phasing of the pump checked and the injectors tested for correct atomisation.
In this way 2001 passed pretty quickly. Another wish list was made for 2002, including refitting the hydraulic brake mechanism, finishing all the mudguards, rewiring the whole bus, etc, etc.
The brakes were overhauled, with Marion Brake and Clutch Service in Belmore resleeving all the cylinders. The servo was tarted up, re-united with the master cylinder and the whole lot reassembled to the vehicle. With the cab floor out it was easier to get the tricky adjustment of the front pull rod from pedal to servo. All the lines were flushed through with methylated spirits under pressure, and repairs made to damaged sections. New hydraulic hoses miraculously came from Marions. The big vacuum pipe from tank to servo was badly crushed, so a new one was made by a plumber friend who sweated off the old fittings and brazed them onto the new 1 1/8 inch copper pipe obtained from Hornsby scrap metal, and did a very neat job of making a 90° bend in it. The heavy battery cables were made up and fitted to the changeover switch and starter, then the new cab floor could go in and be covered with malthoid.

MY FRIEND BARRIE KEYS, A PLUMBER, BRAZES THE SALVAGED FITTINGS ONTO A NEW MAIN PIPE FROM VACUUM TANK TO BRAKE SERVO. THE PIPE TO RIGHT HAD BEEN SQUASHED FLAT AFTER ARGUMENTS WITH EARTH BANKS OR TREE STUMPS DURING THE BUS' LIFE IN THE COUNTRY
A new instrument board (made of wood and polished) was cut out of Pacific maple, the nearest thing I could find in appearance to the original. The metal instrument panel, after stripping two layers of brown paint from it, turned out to be black stove enamel with the Leyland logo in delicate white lettering in the centre. I gave it to an artist who touched up the lettering in model makers enamel. Very energetic enquiries were made to find a Smith’s eight-day clock to replace the missing one. Ron Button put me onto Barry Cliff in Elanora who had one! I had seen them for sale on the net for up to $600, and although Barry’s one was rough, he only wanted $80. Later Paul Adams from the Albion Club in Scotland, who had also been looking on my behalf, announced he had found one in very good order, and wanted nothing for it, as a quid pro quo for some assistance with Albion parts. Anybody want an $80 one?
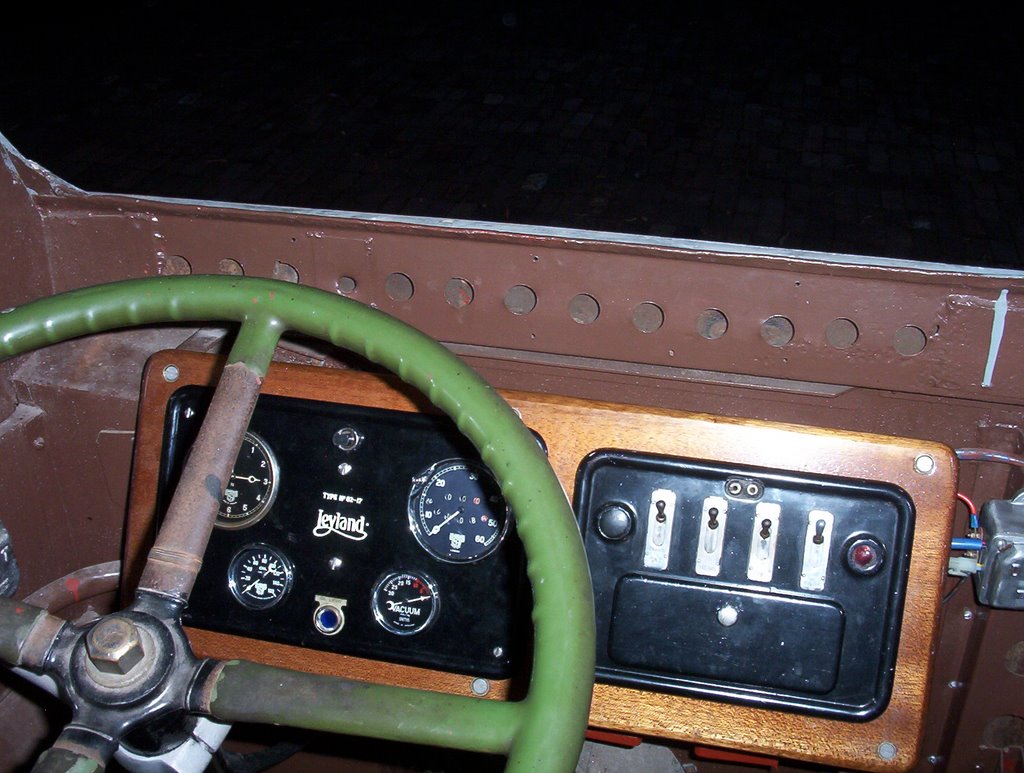
AT LEFT ARE THE INSTRUMENTS INCLUDING REFURBISHED GAUGES FOR OIL AND VACUUM, SPEEDO AND 8-DAY CLOCK. AT RIGHT IS THE DRIVING LIGHT SWITCHBOARD
Then it was back to the mudguards. The nearside guard needed two patches about twelve inches square welded into it, a new inside bottom edge where it abuts the chassis, and a new rear flared section, plus many small dents removed. Two new mounting gussets which sit inside the guard out of sight were made and welded in.

THE UNDERSIDE OF THE LEFT-HAND (NEARSIDE) MUDGUARD, CLAMPED UPRIGHT TO PERMIT EASY ACCESS. THE TWO PATCHES AND THE NEW LOWER SECTION CAN BE SEEN. THE ARROW IS TO REMIND ME WHICH WAY IS DOWN: I FOUND MYSELF LOSING TRACK OF WHICH WAY UP I WAS SEEING IT
The roof front canopy had some serious dents in it, visible in the photo taken at Yeoval, so it was taken off and panel beating began. Brian Mantle advised taking it onto the lawn and stamping on it as a first step. I actually did this on a flattened washing machine carton and it worked. Then a lot of gentle tapping with a wooden hammer plus some body filler made it look pretty good.
On a friend’s suggestion, in mid-2002 I put an ad in Manly Backpackers Hostel to find a casual worker to do the horrible job of stripping off the ceilings, top and bottom deck. Danny, a young man from Queensland turned up and did a superb job, using a cup shaped wire brush in a four inch angle grinder. This took some weeks part time, and I then got him to strip off all the external panels using paint stripper, on which he also did a beautiful job. The ceilings were primed in grey etch primer. Now was a good time to install all the new wiring for interior lights, buzzer, tail/stop lamps, desto boxes, etc. The wire came from Hornsby scrap metal: somebody had just cleared out a whole pile of part reels of wire in all sorts of colours and sizes, perfect for the job and paid for with aluminium cans and scrap from my washing machine activities.
At last the possibility of repanelling could be contemplated. First though, one thing had to happen. Many years earlier at Tempe a new steel panel had been made for the front wall of the back platform, the one under the little window next to the seat over the nearside wheel arch.
This panel needed an external return edge welded onto it, all the way from top to bottom, and curved to the shape of the body. I had put this off because the weld looked so hard with every possibility of lumps or burn holes resulting. But the mudguards had gone well, so I gave it a go and the result was pleasing after a bit of grinding smooth and some filler. Now the first body panel could go on. Not just yet. First, more mudguards.
THE NEARSIDE REAR WHEEL ARCH HAS BEEN REPLACED, WITH THE ORIGINAL THREE SWAGES REPRODUCED. THE EXTERNAL MUDGUARD IS HELD IN PLACE WITH MAGNETS TO GAUGE HOW IT WILL FIT. IT HAS BEEN HEATED, SHRUNK, PANEL BEATEN AND WELDED TO RETURN IT TO SIZE AND SHAPE, AND WILL GET A NEW INNER FLANGE

A NEW INNER FLANGE TACK WELDED ONTO THE RESTORED NEARSIDE REAR MUDGUARD
The two rear ones got new inner flanges, plus the outer faces heavily straightened and shrunk back to original diameter after many years of dents and tears had caused them to stretch to the point where they were bigger (49.5”) than their wheel arches (48”). Then the two rear wheel arches were remade in new metal with their characteristic pre-war swaging. Danny cleaned out and primed the chassis in those areas with the old wheel arches out of the way, and the wheel arches were welded in and their interior valances, those curved panels that sit under the two longitudinal rear seats, got new bottom edges where rust had attacked them, and were bolted in. It was now early 2003.
After Danny tore up all the old malthoid from the bottom deck floor some repairs were made to floor boards here and there and also to the boxing around the rear wheel arches. For some reason I felt the urge to make and fit the steel core of the eyebrow over the cab/engine bay. The steel for this had come from the same sheet as the offside rear wheel arch, so was lying around waiting to be used. The old one, although horribly rusted and plated over with two layers of aluminium to hide this, was able to provide a rough pattern for the new one. To my horror, I found on offering this up to the bus that I had cut off the front of the top deck floor boards too short. They have to stick out far more than I had expected. I was forced to cut and bend a batten and fix it across the front edges of the boards. The curve is pretty severe, but with much clamping and screwing, and the use of liquid nails, the batten went on and stayed on. I left it clamped for two weeks while the liquid nails hardened and it didn’t spring away at the ends. A borrowed planer was used to create the correct curve on the front of the batten. So the steel part of the eyebrow went on, got nailed in place and was left to await the aluminium sheathing which is the very last panel to be fitted onto the bottom deck.
CURVING DOWN THE SIDE OF THE BODY IS THE RETURN WELDED ONTO THE REAR PLATFORM BULKHEAD, A NECESSARY PRELIMINARY TO FITTING THE FIRST EXTERNAL PANEL
Up to this point almost everything that had been done, except the mudguards, was distinguished by the fact that it was all going to be covered up eventually by panels or flooring or trims. Exterior panelling is different: it shows! I sought advice from a real expert in the field, Chris O’Brien. Chris has generously given his time to ensure that the outer surfaces of the frame are good enough to take panels without creasing bowing or buckling. After considerable checking, the first panel, the nearside rear just in front of the back platform, was fitted on 15 June 2003. This was not a new one: the old one had a few minor dents and scratches which were dressed and filled with primer. This was partly because making a new one was quite tricky due to the need to match the shape of the wheel arch.

CHRIS O'BRIEN (CENTRE) AND SELF TRY NOT TO LOOK TOO EXCITED AS THE FIRST PANEL IS HELD UP IN PLACE. THE POP RIVETING TOOL WOULD NOT ACCEPT 1/4" RIVETS AND SO A SEARCH BEGAN FOR ONE THAT WOULD. NOT EASY TO FIND, IT TURNED OUT.
About half the original panels will be reused, but the rejects have not been wasted. They are cut up to make smaller items for other areas, such as sill covers, pillar caps and the two rear panels behind the back platform. In all only nine 8 x 4 sheets of aluminium will be used, obtained at rock bottom price thanks to Mal Morgan.
Once the first panel went on all the other bottom deck ones just seemed to fall into place. New ones are easy to make using the guillotine at Tempe and the precious swaging tool, for which the correct dies are on loan from Brian Mantle. There was a bit of caution needed with the panels that have swages curving up and over the engine bay and back platform, but under Chris’s eagle eye these have turned out beautifully. Similarly with the aluminium cladding of the eyebrow, which has a swage running across it from side to side and has to meet the cant rail swages neatly. Chris has a calm and patient approach which produced a successful outcome.
Brian also gave me his beautifully made rear destination box to replace the one removed and thrown away, probably in 1953 at the bus’ last overhaul. This is now in place with its mechanism and winder restored, as is the side box, made new a couple of years ago. A tiny flaw now emerges in the route number boxes: in 1937 they were a two-digit display. I have reluctantly decided to retain the 3-digit display because 1) it makes life easier and 2) it enables today’s three-digit routes (eg 444) to be displayed.
The whole of the bottom deck is now panelled and by the time this text appears the top deck should be largely completed. After that only the roof remains as a major battle zone. It still has quite a few dents and needs to be stripped of paint. Although most of the original syndicate members have melted away, Gwilym still helps me when he can, David Wilson helps with advice on obscure body detail and, best of all, with small components which have gone missing over the years, while Brian Mantle is a fount of wisdom on body building techniques.
With the bottom deck panelled it is now possible to look at the interior with some interest. I was anxious replace the small enamelled rego plates which appeared on the front and rear bulkheads downstairs. Vic Solomons lent me m/o 1567, which has all the digits necessary to make a 1579 copy (by turning the 6 upside down) and I began to ring enamellers. These days all they want to do is your bath, and that not even in vitreous enamel, but I found a very helpful lady at Australian Craft Magazine who put me onto Ken Joyce in Dulwich Hill who does jewellery and vitreous enamelling. He happily took on the job, so we will have two m/o1579 plates in yellow and black, in the correct numeral style, one of these days. David Wilson and I are still trying to find somebody who can make several copies of a pre-war 44” destination roll, not only for this bus but for other pre-wars that need them. Not surprisingly, some of the old skills are hard to come by.
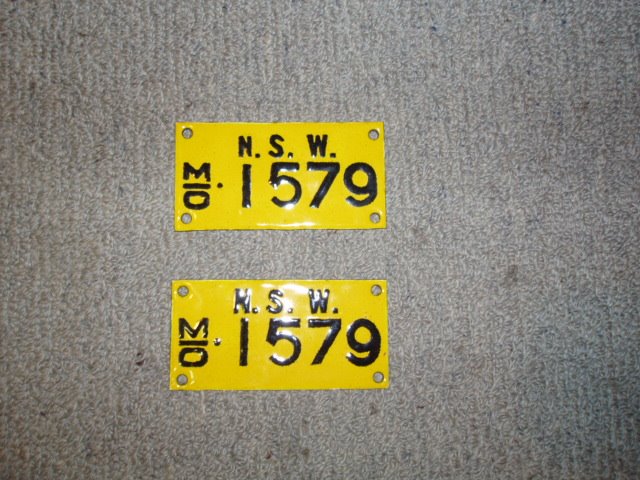
THE TWO VITREOUS ENAMEL FACSIMILE NUMBER PLATES WHICH WILL GO INTO THE LOWER DECK, ONE AT EACH END BULKHEAD. I suppose they were meant to reassure passengers that the bus was actually registered as such.
From time to time it appears to me that the works described above are taking a very long time to complete. The feeling only increases when one reflects that from June 1937 when m/o 1579 hit the road, to approximately June 1940 when bus deliveries ceased owing to World War Two, a total of about 320 buses were delivered to the Department of Road Transport and Tramways. Of these, over 300 were bodied by Waddingtons – a rate of two per week. Maybe it is easier to make new than to fix old ones.
Recently I heard on the radio a discussion about the things it takes you most of your life to learn, but nobody ever tells you. One was there is a fine line between ‘hobby’ and mental illness. I wonder. Finally, can anybody help me with photos of the interior of a pre-war decker, showing the original signwriting?
2 comments:
Thanks a lot for your information. It gives more information and its very
useful for me.
Cheap Leyland For Sale
This is a really excellent read for me. Must agree that you are one of the best blogger I ever saw. Thanks for posting this informative articleelectrical switchboards adelaide
Post a Comment