Thursday, October 26, 2006

Not the Autovac Again

About three months ago I thought I had the leaking Autovac stopcock problem solved, using rubber as the material for the sealing washer. It was uncertain whether that rubber would be resistant to attack from diesel oil: it isn't. The thing is leaking again and the rubber edge leaves black on your finger tip.

The tip of rubber can be seen poking out of the circular body of the three-way cock on the right. Unfortunately I didn't make the camera focus on the stop-cock: the engine cover took precedence. But if you click on the photo you can just see that on the hexagonal mounting flange above it says "OFF", and "RESERVE" to the right. On the face to the left out of sight it says "RUN". That is what the cock is for: to provide a reserve supply if you run out of fuel on the road. Seeing that all Government buses were refuelled without fail at the end of every shift, and had 35 or 40 gallon fuel tanks, it was a feature unlikely ever to be used.
Next try: use rubber from a piece of an old tyre inner tube, cadged from the tyre service. This should be butyl rubber and oil-resistant. If not, high quality cork sheeting may have to be resorted to: the original was this material but it's not easy to find nowadays.
The Autovac is such an integral part of Leylands of the mid-1930s and the three-way cock so inseparable from it, that whatever the problem it will be overcome.

Where Do You Get the Parts?

A frequently asked question, by friends, visitors, strangers on learning what is being restored, is "Where do you get the parts?" Always in those exact words.
At first I was taken aback by the question and would say "Oh, from wherever.." but slowly learned to explain that parts when needed are one of the following: either you buy then from a hardware shop like Bunnings, a specialist fastener supplier or a motor spares shop like Auto-One, or you make them, or they are provided by friends here or in the UK who have had the foresight to preserve such things from other, derelict, vehicles of the era, or they are made to order by specialist trades, or they are cannibalised from another bus, or they come from my stash of oddments collected over years, bower bird fashion. For 35 years I have compulsively hoarded anything that looked useful. Bits of wood, metal, nuts, bolts, screws, wire, pipe, tube, electrical fiitings you name it, and unbelievably the collection just keeps coming up trumps.
Having just had the task with my brother and sister of clearing out our parents' home in Canberra with its 50 years of accumulated treasure, I am very mindful of what awaits my children when I shuffle off. I don't imagine they will see my hoard as the priceless treasure it is, so the question is how and when to downsize!

A case in point is this:

Under the staircase is a luggage area. Its front wall is the bulkhead to the left in this shot. Out of sight to the right under the stairs is a doorway to the unused space under the first four steps. A look at the TD5 in the collection at Sydney Bus Museum, Tempe revealed that there is a door here, missing from 379. Chances of finding another are zero, so a new one was made from sheet steel, with a half-round swage rolled in it, and so-called wired edges: ie the sharp edges of the steel rolled over 3/16" wire all around the circumference. Brian Mantle told me the trick to this: allow 3x the diameter of the wire, and cut to that depth into a piece of 1/2" steel bar with a hacksaw. Pushing the bar over the cut edge, lift it up to form a lip all the way around the sheet, lay the wire into the lip and tap with a small hammer so that the steel rolls over the wire. Bingo: a wired edge.

In all its red glory this is the door, with wired edge, swaged rib an inch or two in from the edge all around to stiffen it, and to be a bit decorative, and with a DRTT-pattern latch and butterfly hinges taken from an old destination display hatch out of an early underfloor-engined single decker sold for scrap. The other side is painted brown, to fit in with the convention that red is exterior, brown is interior.

Monday, October 23, 2006

After Painting: the Bright and the Dark Side Revealed

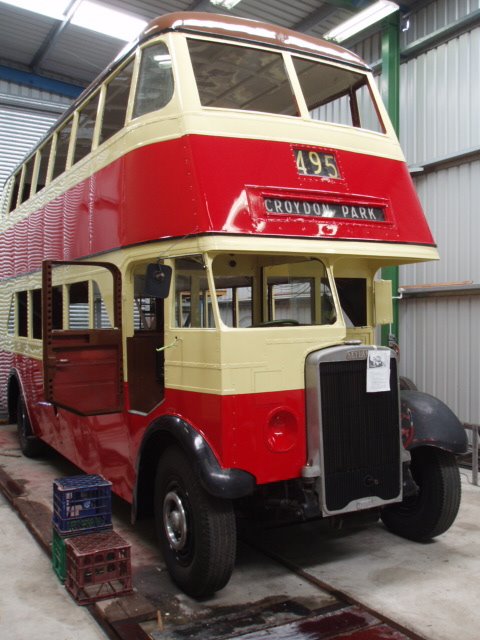
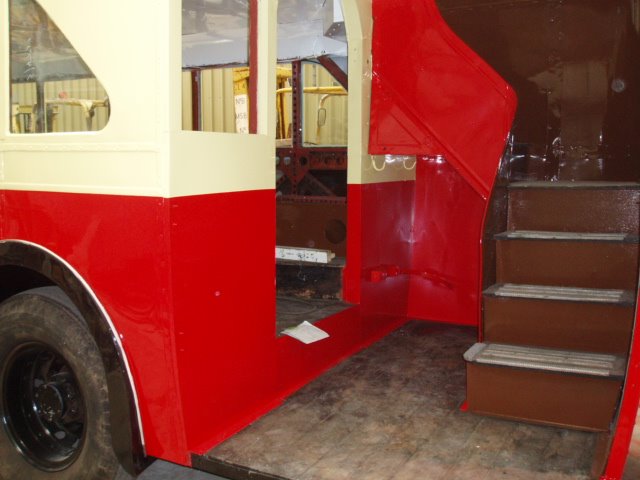
Safely back in the garage at Turramurra, work on fitting all the bright parts could begin, and the job of applying Malthoid flooring to the bottom deck and rear platform.

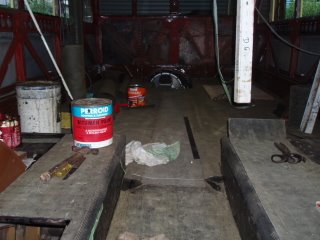
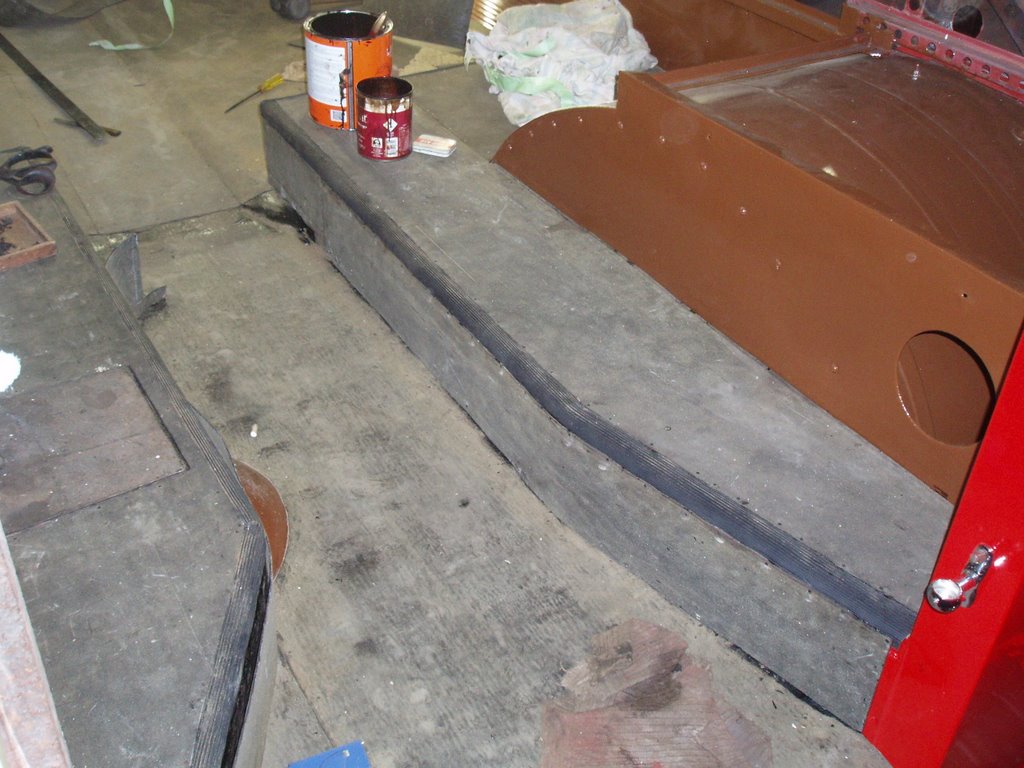
THE BOTTOM DECK IS PARTIALLY RECOVERED IN ITS ORIGINAL 1937 FLOORING MATERIAL, MALTHOID. TODAY ONE CAN ONLY BUY TWO-PLY MALTHOID, WHEREAS WADDINGTONS USED 5-PLY. SO A FIRST LAYER OF THE 2-PLY ROOFING MATERIAL IS LAID FOLLOWED BY ANOTHER COAT OF BRUSH-ON SEALER AND THEN A LAYER OF THE DAMP COURSING WHICH HAS A SANDY FINISH. THE RESULT LOOKS THE SAME AS THE ORIGINAL AND IS PRETTY MUCH THE SAME THICKNESS. The centre aisle however has been laid with a single thickness of 5-ply from a roll 12" wide which came to me from I forget where years ago. The same roll has provided all the malthoid for stair treads, so I suspect it was a Government bus workshops stock item for just these purposes. In the distance it can be seen that the clutch housing does not align with the centre of the floor aisle: the engine, gearbox, drive line and differential are all offset to the left.
It is mildly amazing to me that a product like Malthoid is still around today, after being on the market for at least 80-90 years, maybe more. Today it is known as a roofing or damp coursing material, whereas in 1937 it was widely used for flooring, being waterproof and non-slip and hardwearing. It is bituminous woollen felt, dusted with sand if it is to be used as damp coursing. It was in this guise that it was used as flooring for all Sydney's buses in the 1930s 40s and 50s. Elsewhere in the world it is known as Pabco, Ruberoid, Ormonoid, and many other brand names. To hold it down one uses cut tacks and bitumen sealer in brushing form, and this stuff also does well as a preservative of the wooden floor boards: the bottom deck floor is original, after 70 years. A four litre can of sealer set me back $32 at Bunnings, plus 5 litres of turps to keep the brush clean. Also from Bunnings came blued cut tacks: an item of hardware not as easily found today it was 20 years ago.
Laying Malthoid is dusty, dirty, messy and not my favourite activity, but once done it is there for the next 50 years or so!

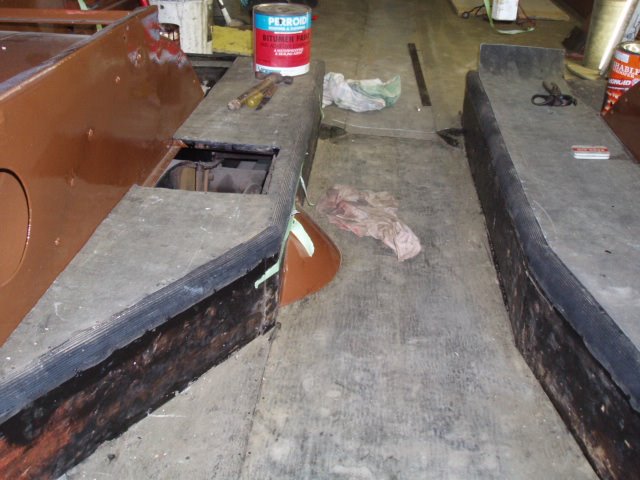
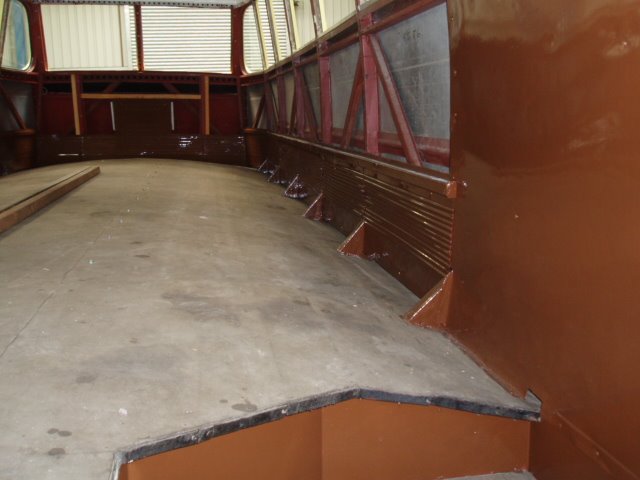
AROUND THE BOXES ENCLOSING THE REAR WHEELS AND DIFFERENTIAL WAS AN EDGING OF RIBBED RUBBER MOULDING. MY FRIEND DAVID WILSON IN HIS INFINITE WISDOM MANAGED TO SNAFFLE SOME STOCK OF THIS FROM THE GOVERNMENT BUS WORKSHOPS BEFORE THEY CLOSED THIRTY YEARS AGO, AND HERE IT IS, FORMING A CUSHIONED WEARING EDGE TO THE BOXING. IT IS TACKED IN POSTION AND THE MALTHOID IS LAID OVER IT, UP TO THE EDGE OF THE RIBBING. The hole in the top of the left hand box is an access hatch to the differential oil filler. In all English double deckers of the period, the drive line is offset to the left to keep the centre aisle floor level low.

Wheel boxes largely complete, and the hatch in place over the diff oil filler. Nearly ready for passengers to trample it down.
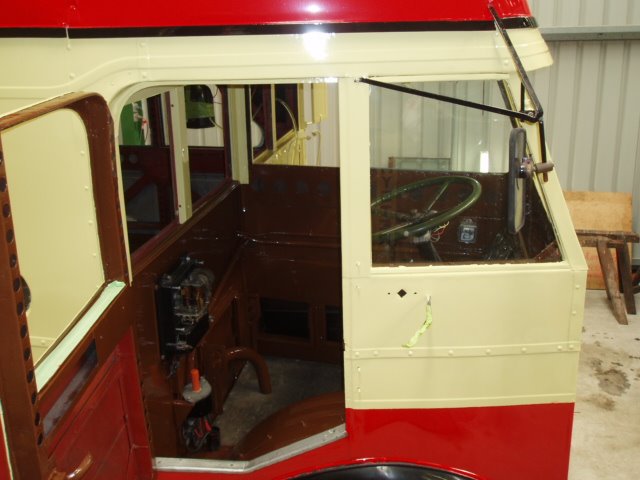
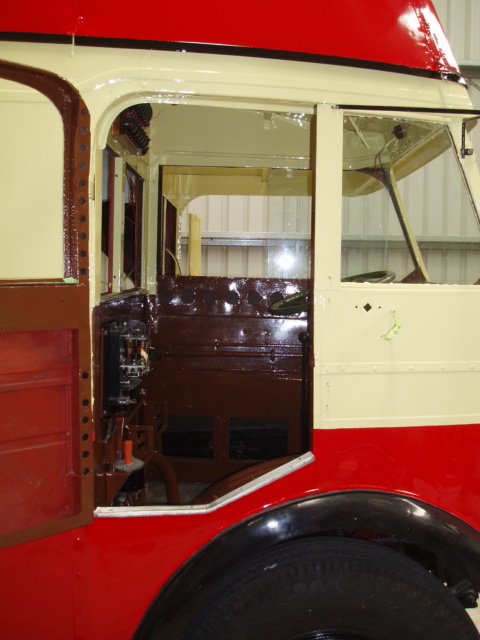
The other side of recent activity is fitting all the lovely chrome plated fittings for hand rails and posts, signal arm, sun visor etc.

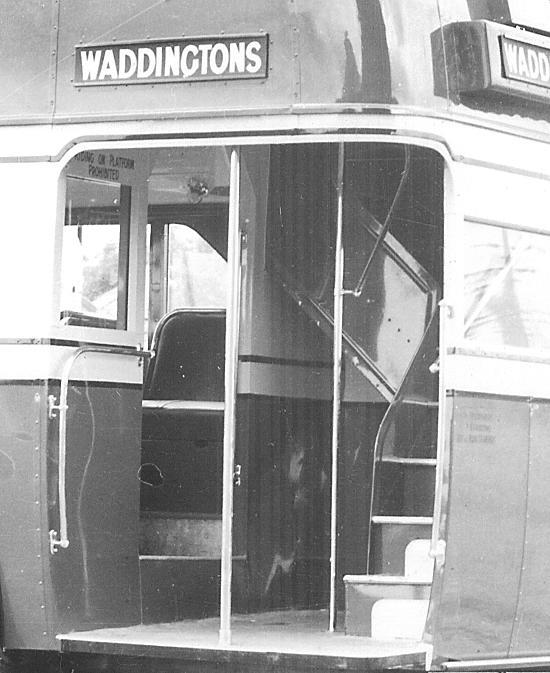
ON THE BACK PLATFORM, SOME OF THE MANY HANDRAILS AND POSTS HAVE APPEARED. THE CENTRE ONE NEAREST THE CAMERA WILL NOT BE FITTED UNTIL ALL THE SEATS HAVE BEEN CARRIED INSIDE. THIS WILL BE ONE OF THE LAST THINGS TO HAPPEN, AS SEATS JUST GET IN THE WAY OF OTHER THINGS. THE RAILS UP THE STAIRCASE, WHICH WERE MISSING FROM THE BUS AS RECEIVED, WILL BE BENT FROM NEW TUBING USING THE ONES FROM ALBION 1615 AS PATTERNS. Compare this shot with the one of m/o 1629 taken in 1938, below, in "A Blaze of Colour". NOTE: You can save any of these photos to your own computer by clicking on the picture and, holding the mouse clicked, dragging the shot to your own desktop.

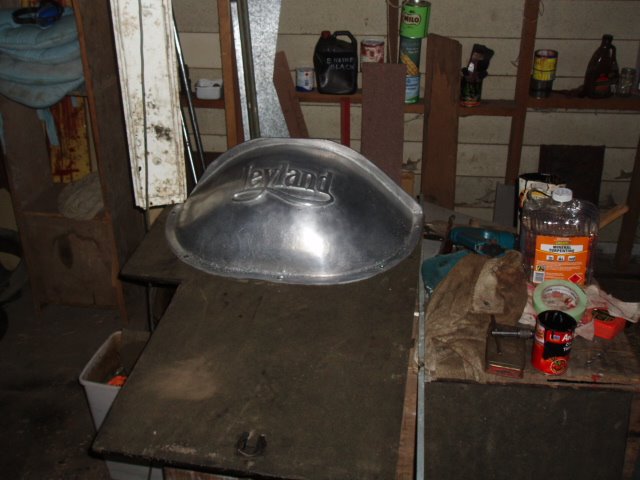
ANOTHER BRIGHT SPOT AMIDST THE GLOOM OF MALTHOID IS THE COVER OVER THE CLUTCH AND GEARBOX. LEYLAND WERE NOT AVERSE TO USING THIS AS A CHANCE TO ADVERTISE THEIR NAME, SO THE WORD APPEARS IN FLOWING SCRIPT ON AN ALUMINIUM ALLOY CASTING WHICH IS HIGHLY AMENABLE TO POLISHING. USING A BRASS-BRISTLE WIRE BRUSH IN AN ANGLE GRINDER THE WORST OF THE CORROSION AND SCRATCHES CAME OFF EASILY AND A BIT OF COARSE WETAND DRY FOLLOWED BY A FINER GRADE, THEN A STEEL WOOL SOAP PAD, THEN METAL POLISH BROUGHT IT UP FAIRLY WELL. A PROFESSIONAL POLISHER COULD HAVE MADE IT LOOK LIKE A MIRROR, BUT THEY WERE NOT LIKE THAT IN 1937.

Sunday, October 08, 2006

The Result Exceeds Expectations!


Early Sunday morning I left home to catch the train to Central, and bus to Loftus (Track work meant no trains on the Illawarra Line). In the workshop where the painting was done the bus had been turned around the previous day after being moved to allow shunting of trams. The rear view is one I had not seen before. The gloss on that red is a treat to behold.

Rob Gregor the painter had come with his wife Pat and a friend with whom Rob been a NSW Railways coach painting apprentice 40 years ago, to see the painted bus emerge. Rob and I stand in front of our proud creation.
The finish on all panels is wonderful and a tribute to Rob's old-fashioned art of coach painting which can achieve a result akin to a spray job, but using a brush.

On Sunday 8th October I saw the finished bus outside in bright sunlight; it's better than I had ever hoped for.

Near the entrance to Sydney Tramway Museum, 1379 poses outside the facade of the YMCA Building from Pitt/Bathurst Streets City, beside a Sydney P Class tram of the 1920s. The two, in these colours, would have been seen together in Sydney streets throughout the 1930s and 40s. photo: Ian Kates

From Loftus up the Princes Highway to Tempe, and the Bus Museum, where two new tyres have to be fitted. For many years the bus has sat on four tyres instead of the normal six, so two old tyres came off the front wheels, to be replaced with new, and to be fitted to the rear so as to have two on each rear wheel.

The tyre fitting press at Tempe Bus Museum makes removing and fitting tyres a lot easier than bashing away by hand. Ian Mair generously gave his time to help with this job.
The tyres came from China (at $180 each, with tubes and rust bands): on one side they are branded "Double Star". On the other they carry a raft of Chinese characters, so trouble was taken to ensure that they were fitted to the rims with the English facing outwards, despite this being not exactly 1937 wording. However the story is that the moulds for these tyres are the original Olympic Trojan ones from Australia, sold to the Chinese, and therefore quite in character for tyres used on this bus during its life. Certainly the tread pattern is that of an Olympic Trojan tyre. Given the mileage this bus will do, they are ideal.

The tricky job begins of reversing off Bobbin Head Road down the drive into the workshop.
The run from Loftus has been a treat. The bus runs quietly, smoothly and at last I have got the hang of the gearchange, even to the point of doing it without the clutch, timing the change by the sound of the engine and allowing for road speed. The steering is light and precise, and the engine hums like a sewing machine, but being a Leyland 8.6 litre it has that wonderful howl at higher revs, produced by the gears driving the overhead camshaft. The only reason I am restoring this bus is to hear that sound again.

Back at Turramurra Works in Bobbin Head Road, after an absence of four weeks. Now to fit flooring, windows, seats, handrails, plated fittings and interior trims and interior lights.

Wednesday, October 04, 2006

Before and After


Over the engine bay the cant rail was bad. The new front header rail, the side one, the ceiling and the gussets are now resplendent in cream.


Meanwhile on the driver's side the story was much the same. I admit that the mirror is not of the 1930s pattern: it is the larger post-war one, but much the safer for it, yet still about 50 years old in design. (instead of 70).


Soon after arrival at Turramurra from Tempe in 1996, the bare frame, engine and chassis was steam cleaned prior to beginning major frame repairs. Now the headlight is back in its 1937 position, and somehow the red livery looks far more dazzling than any black and white photo of that era.


With the cab floor out it was easy to stand on the ground to attend to all the many aspects of the drivers cab: wiring, controls, stripping of paint, and the drivers seat.


Upstairs, viewed from the stairwell, the distinctive pre-war corrugated kick plates now cover all the repairs to the framing, and the massive angled brackets holding the top deck down to the floor are now painted in their correct brown.


On the back platform all traces of post war green have gone, and the panels await nothing but the black lining below the windows and between colours.